PAYHIP 100% FREE FOREVER WEBSITE, STORE, SALES & MEMBERSHIP PLATFORM TO SELL PHYSICAL & DIGITAL PRODUCTS.
Payhip is a 100% FREE website, online store builder for physical and digital products, you can even add courses and even has the capability to build a membership system to allow customers to pay you either a flat fee or a recurring monthly fee to join.
In this tutorial document I will show you EXACTLY, step by step how to sign up and set up your very own Payhip website and store. NO credit or debit card needed, and you can sign up for FREE within minutes!
LET’S GET STARTED:
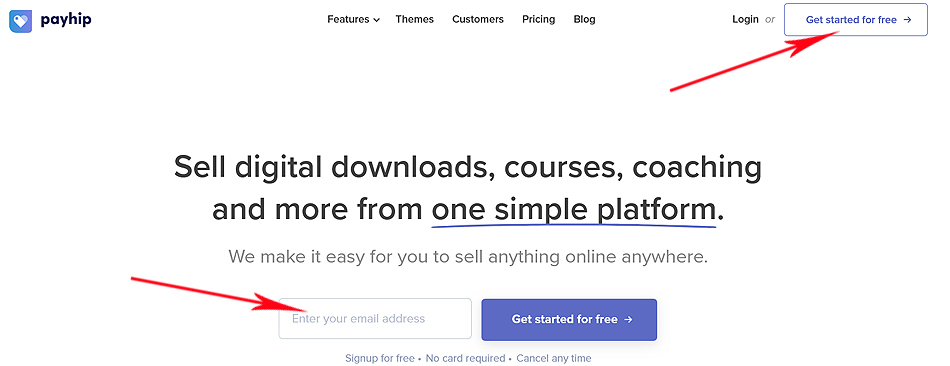
1st go to https://payhip.com/ and click either the link/button named “Get Started for FREE” top right of their page or in the centre of the page as in my screenshot below.
ENTERING DETAILS TO START:
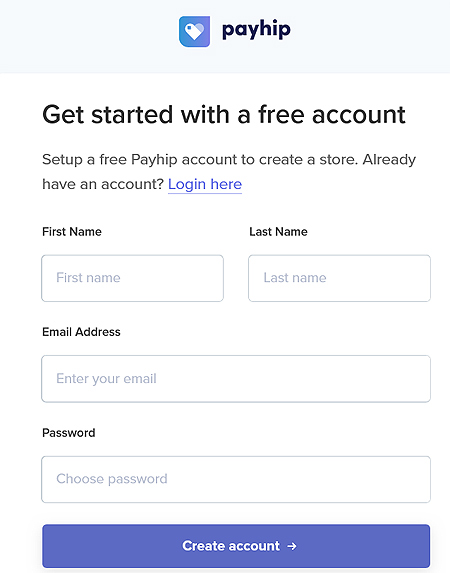
A “Get started with a free account” box will appear for you to fill in.
Make sure you enter ALL your details in here correctly.
- First name.
- Last name.
- Email Address.
- Password (that you can remember).
Next click the blue button named “Create Account”.
You may be asked to confirm your email at this point or, depending on your browser you may just be able to carry on. Either way the next section is for setting everything up.
SETTING UP YOUR STORE:
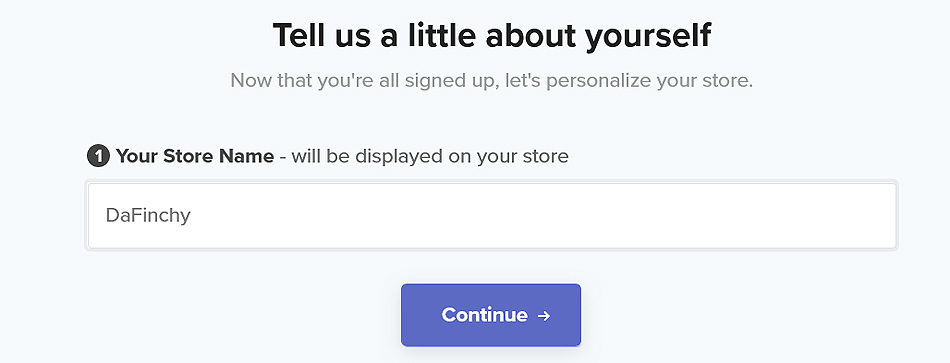
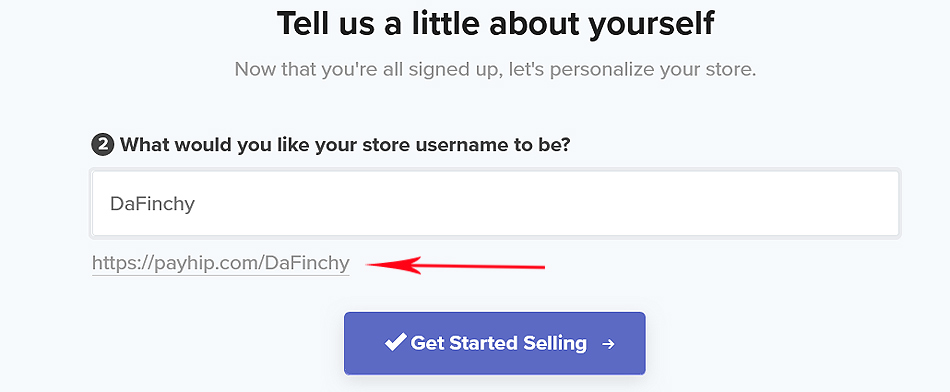
Next you will see a box as in my screenshot below named “Tell us a little about yourself” and in this box you need to choose a name for your website/store, as you can see, I have typed in “Dafinchy”. If the name you chose is already taken you will be notified of this and you can choose again. Click “Continue”.
When you click continue, the next box will show you your new website/store url (website address) and as you can see from mine my new website/store will be https://payhip.com/DaFinchy, go take a look if you like as you are here.
MOVING ON TO CONTINUE SET UP:
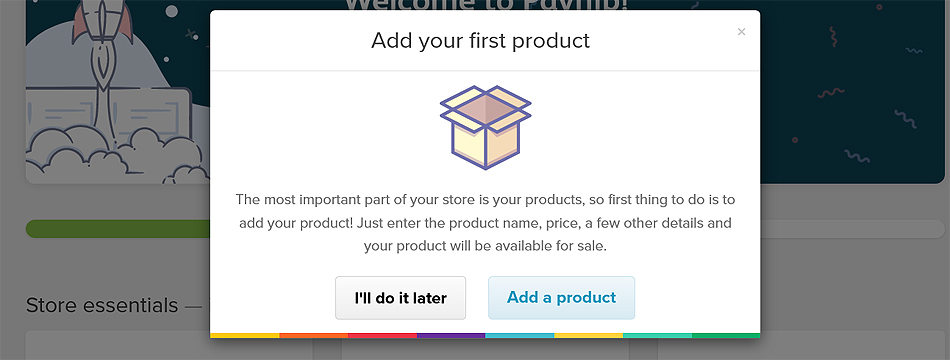
The next box you will see is named “Welcome to Payhip” as in the screenshot below, and on this page you can start by adding a product but, don’t worry if you don’t have one yet, after you click next you can then click a pop up that says “I’ll do this later” but for those of you who have a product then follow along with this section.
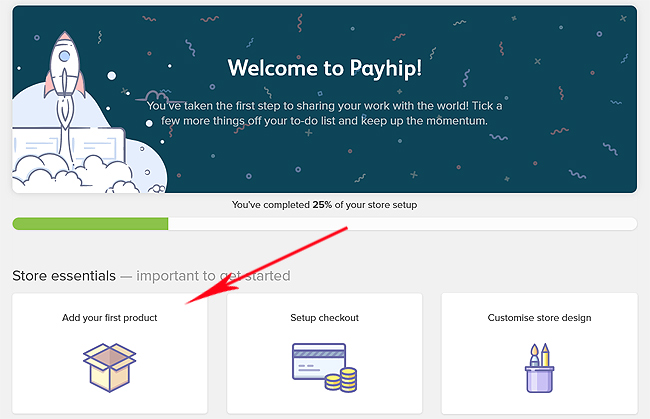
So, if you have a product to sell then click the “Add your first product” box, if not just click the pop up that appears and choose “I’ll do it later” as in screenshot below.
ADDING YOUR FIRST PRODUCT:
For the purposes of this tutorial, I am going to show you how to add your first product, if you do not have a product yet you can skip this section and refer back to it when you have products.
If you are adding a product at this point like me then you can choose the type of product you wish to start adding to your website/store. The choices are as follows.
- Digital Product.
- A Course (tutorial).
- A Membership (Customers pay you to join).
- A Physical product (one that must be shipped).
- A Coaching service
- A Bundle (1 or more products that can be sold together)
The choice of course is yours but for the purposes of this tutorial I am going to choose a “Digital Product” but don’t worry the process is pretty much the same for all the other choices.

WHY DIGITAL PRODUCTS:
- I personally choose digital products because of the reasons listed below.
- You only have to make it ONCE!
- I can sell it over and over again.
- I can sell it individually or in a bundle.
- I can sell it with MRR (master resell rights) so you can slap your name on it and sell it as your very own.
- I can sell it as PLR (Private Label Rights) which means you can sell the end product as your own.
- I only have to list it in my store ONCE!
- I can use it as a template to make hundreds of other digital products and do the same as above.
- I can sell them as either tutorials, courses, use them as FREE gifts or “Lead magnets”.
- I can ask people for their email address so they can download them and grow my mailing list for FREE!
- Now you see why I prefer DIGITAL PRODUCTS, no shipping, no physical storage, easy to sell!
OK, let’s move on to adding a digital product to our FREE Payhip store.
LET’S ADD A DIGITAL PRODUCT (This method is pretty much the same for a “physical product”).
This section is named “Add new digital product”.
In the screenshot below you will notice I have added RED arrows and numbered them, this is so it will be easier for you to follow along, I will explain each step “RED arrow” below my screenshot.
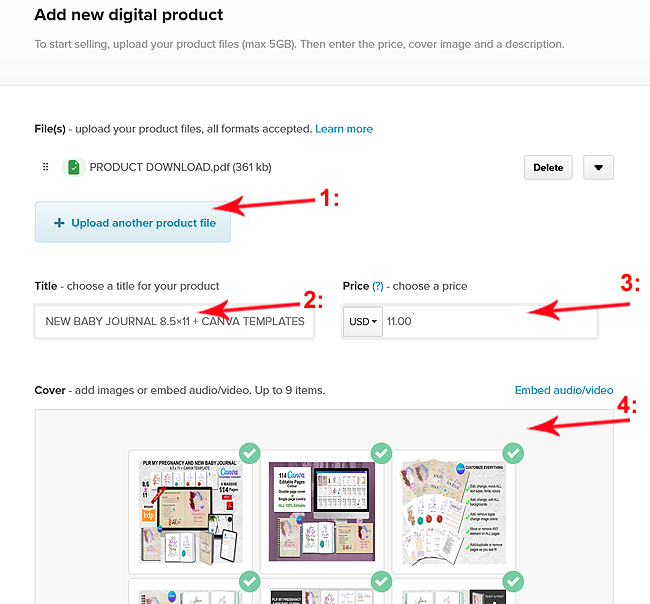
1: Click the “+ Upload product file” button to either choose your digital file from your hard drive or wherever it is stored (possibly cloud). Once you have chosen your file it will display with a GREEN icon to the left of it, if the file needs renaming then you can do this by clicking the small BLACK arrow to the right and this will give you the option to rename your file (digital product).
2: The TITLE box, you can type in any title you wish here just make sure that it makes sense to a customer and is simple and straight forward.
3: The PRICE sections, here you can choose in what currency you wish to sell your product (I personally always choose $ as it is known world-wide). Next to the currency choice you can type in your price remembering to add any decimal places i.e. $11 is incorrect, use £11.00 is correct and so on.
4: The COVER (add/upload product images section). In here you can add/upload up to 9 images + you can also add video, just click inside this section to start uploading images either for you hard drive or cloud. If you wish to add a product video, then click the link to the right in blue named “Embed audio/video” and do the same.
As you continue to add/upload your product it should “auto-save” but there is also either a “SAVE” or “SAVE CHANGES” button at the bottom of the screen.
Moving on to the final section of adding your product as in screenshot, please note this is on the SAME page as sections 1-4 on the previous page. Again, I will break down the numbered RED arrows below the screenshot.
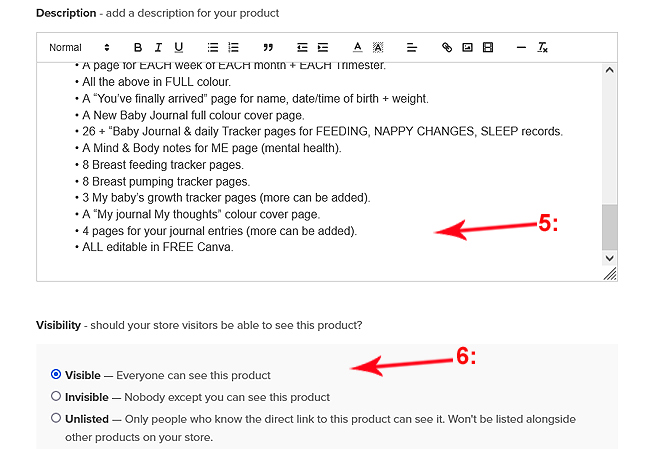
5: The DESCRIPTION box and editor. This is where you type out your product description, it is much like a Word document editor as it has similar functions i.e. BOLD, italic, underscore, bullet points etc.
6: VISIBILITY options. You can choose 3 options here, VISIBLE, this means it will appear live on your store as an item that can be purchased. INVISIBLE, nobody can see this product only you, in your admin. UNLISTED, this is a good one to hide from some customers but only show to others, you can copy a private link in admin and send to people who you wish to buy.
No matter which option you choose here you can always change it later in your admin.
COMPLETING YOUR PRODUCT ADDING AND VIEWING LIVE.
Once you have completed the steps listed above you should click the SAVE button or SAVE CHANGES button at the bottom of the screen. Once you click SAVE then you will see the “PRODUCT ADDED” page where you can click “Show me my product page” BLUE button to view your finished product.
You can also copy the link that appears on this page and share it on other websites, other platforms and of course in your social media links.
And finally on this section you can also “Direct Share” to the options allowed such as Facebook or Twitter now called “X”. As shown in my screenshot below.

Now that we’ve learned to sign up and add a product let’s move on to the boring stuff, THE TECHIE SIDE OF THINGS in “Your Account” as this is VERY IMORTANT!
DO NOT miss any of the following steps or your website/store may not function or display correctly.
I promise it is not that difficult as in the following sections I am going to break it all down for you in easy-to-follow steps with my usual screenshots.
So, go grab yourself a cuppa and let’s move on. ☕
YOUR ACCOUNT & SETTINGS:
Boring I know but it has to be done and hey, you only have to set this up ONCE!😊
On any page look top right and you will see a button named “Account”, click this once and a drop-down menu will appear, now click “Settings” from this menu as in my screenshot below.

This will display a page with 8 tabs on it, it may look scary at first but don’t worry. Click onto the first TAB 1: “Store” which will display the page as in the following screenshot.
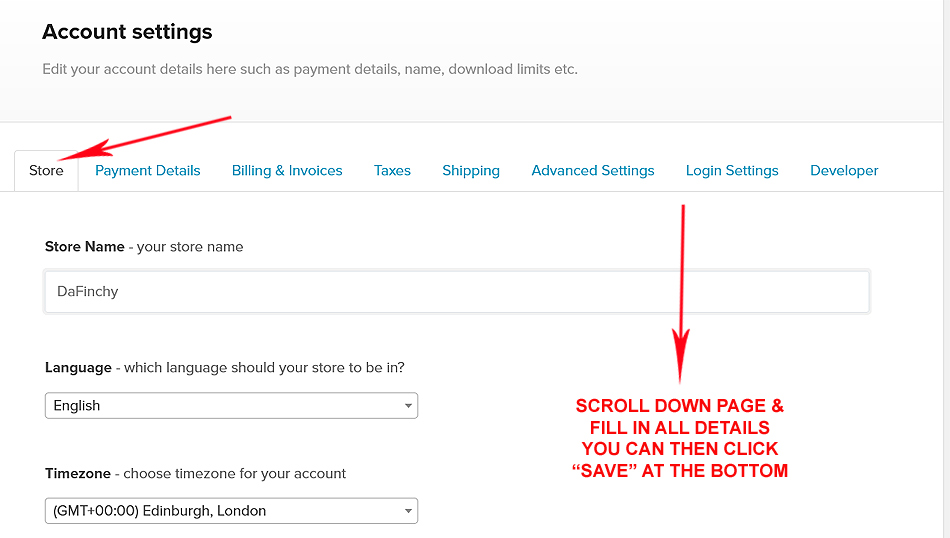
On this page you need to check that all the fields/boxes are filled in correctly, if any aren’t, just make any changes as needed. If you scroll down this “Store” page you can also add your social media accounts too, once you are happy with all your details make sure to click the “SAVE SETTINGS” blue button at the bottom.
TAB 2: “payment Details”.
This is one of the MOST IMPORTANT STEPS to complete, otherwise you won’t get paid, and customers won’t be able to pay online for your products or services or even memberships!
I’m going to focus on 2 payment account types (you can use both at the same time), one is STRIPE which is excellent to be able to accept debit and credit card payments, the other is PayPal which is used globally. So, let’s look at the “Payment details” page and again, I have RED arrowed sections with numbers as in screenshot.
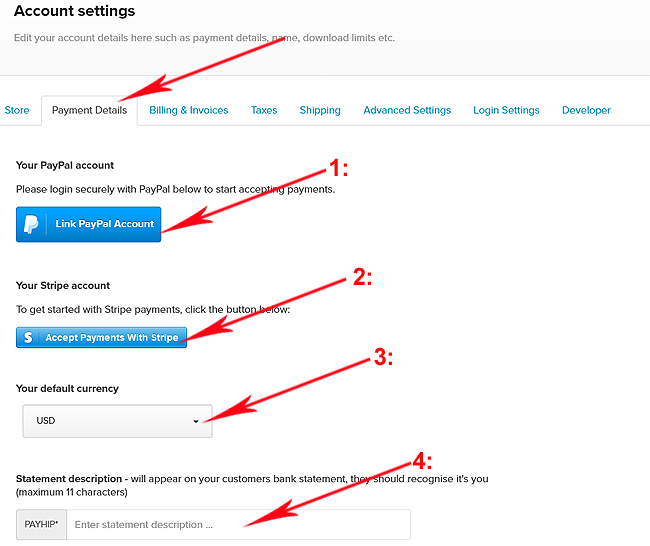
1: Link PayPal Account.
Click this button and follow the onscreen instructions, if you don’t have a PayPal Business account click the following link which is a great video on how to set one up. CLICK HERE TO WATCH THE VIDEO or if you already have a PayPal personal account and don’t know how to convert it to a business account click the next link to watch a great video on just how to do that. CLICK HERE TO WATCH THE VIDEO.
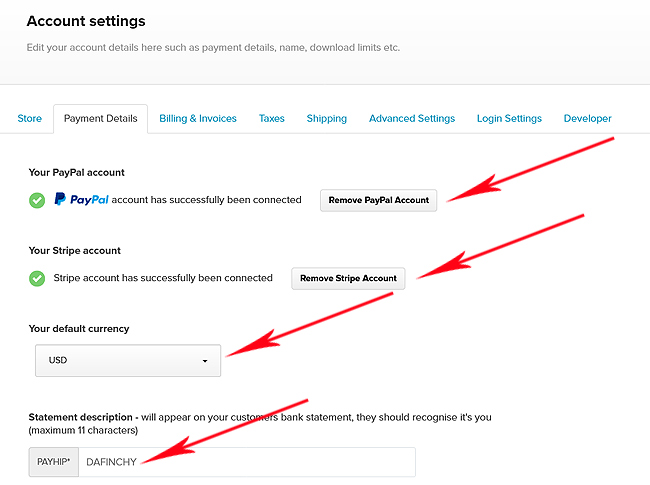
Now, let’s assume that you have now connected/linked your PayPal account. Let’s move on.
2: Accept Payments with Stripe.
Click the BLUE button and follow the onscreen instructions. If you don’t have a FREE stripe account, then click the following link to watch a great tutorial on how to get one. CLICK HERE TO WATCH THE VIDEO.
3: Your Default Currency.
Choose a currency to suit your needs, just click the drop-down menu. TIP: I personally chose $ US DOLLARS as it’s the MOST widely used currency on websites around the globe & for some reason instils buyer confidence.
4: Statement Description.
This is what the customer will see receipts or statements after purchase. TIP: Keep it short, mine is simply DAFINCHY so they know it’s me they purchased from.
Now that’s been set up make sure you click the BLUE “SAVE SETTINGS” button at the bottom and, once it has saved it should look something like my screenshot on the right.
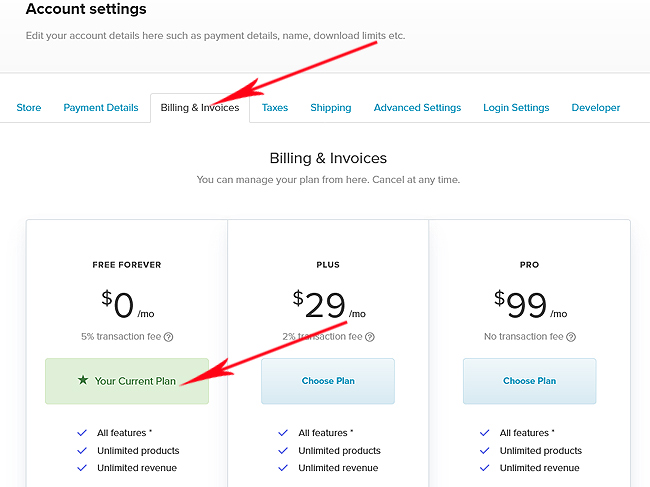
TAB 3: Billing & Invoice.
This one’s very simple, as in my screenshot below you can just leave it as FREE as I have or you can of upgrade on this page but for now, we are going to leave it as FREE.
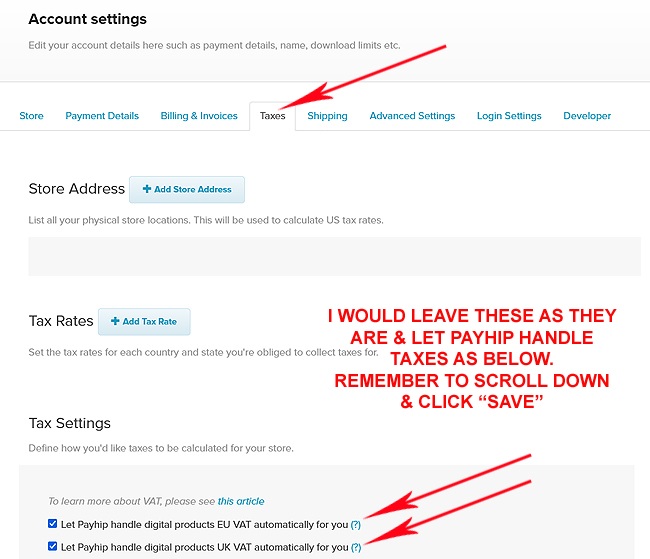
TAB 4: Taxes.
Again, this one is a lot simpler than you’d expect. Look at my screenshot then I’ll explain below it.
TAB 5: Shipping
This is quite a simple one, but you only need fill this one in if you are selling “Physical Products”, so, if you are selling “Digital” products ignore this. However, if you ARE selling “Physical Products” look at the screenshot below then I will explain below it.
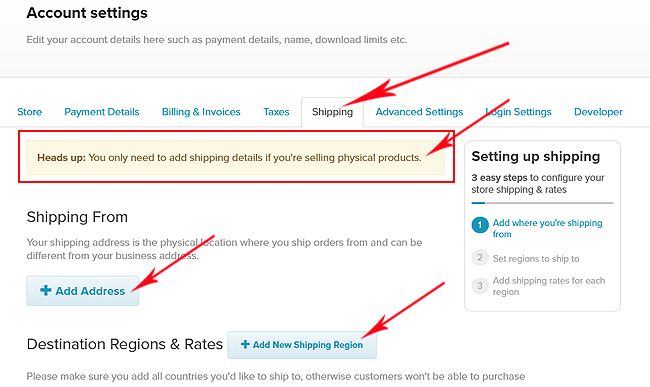
SHIPPING FROM: Click the + Add Address BLUE button, you will see a pop-up box, fill in the address you intend to ship from then click the BLUE “Save” button to complete adding the “FROM” address.
DESTINATION REGIONS & RATES: Once this is clicked it will display a pop-up box, in here you have 2 choices, leave it at “WORLDWIDE” or choose countries you are willing to ship to from the dropdown menu.
You will now be asked to add “Shipping rates” form a selection that appears, just follow the onscreen instructions to complete this section.
NOTE: Remember to click SAVE whenever you see a SAVE button, so you don’t lose any of your settings!
TAB 6: ADVANCED SETTINGS:
Look at the screenshot then I will break this down for you below it.
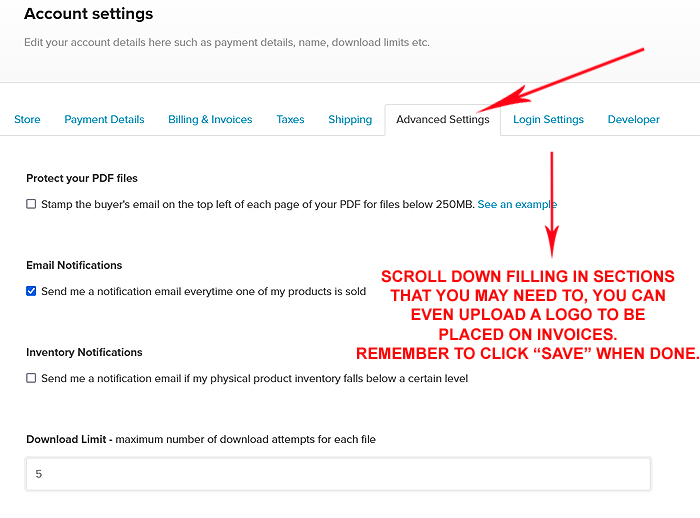
1: Protect your PDF files.
Tick this if you want to stamp your buyers email address in the top left corner of any PDF files (Personally I wouldn’t).
2: Email notifications.
Tick this if you would like to receive an email every time someone buys one of your products (I like to have this one ticked so I can keep track of who is buying what).
3: Inventory notifications.
Tick this to receive a notification email if physical products inventory falls below a certain level, if you tick this another box appears for you to add a number.
4: Download limit.
This refers to “Digital Products”, I personally set this to 5.
5: Google Analytics.
If you have a Google Analytics “Unique ID” you can enter it here for tracking your store usage, if you don’t want to analyse this then just leave it blank.
6: Facebook Pixel.
If you still use FB Pixel then you can add it in here, personally I have never used it as it is a pain.
7: Store Units.
Refers to weights & measurement, IMPERIAL: Pounds & Ounces, METRIC: Kilograms & Centimetres, tick one.
8: Checkout Settings.
TIP: I would tick “Collect customer first and last name during digital product checkout” for newsletter purposes.
9: Course settings.
Tick any that apply to your needs (only if you intend to sell courses) if not then just leave all unticked.
10: Logo & Invoice settings.
Choose to upload a logo to be shown invoices and emails. TIP: If you choose to upload a logo, make sure to tick the “Add your logo on invoices and email receipts that customers receive” box. You can also add your address to receipts and invoices, just place a tick in the box “Add your business address on invoices that customers receive”.
11: Email Receipt
Edit the subject and message for the email receipt sent to customers.
It’s a nice touch to add a good THANK YOU in the “Subject” & a grateful message in the “Message”.
Once you have completed all the sections on this page then remember to CLICK “SAVE SETTINGS”.
TAB 7: Login Settings.
On this page there are 2 tabs, first let’s look at the “GENERAL” tab.
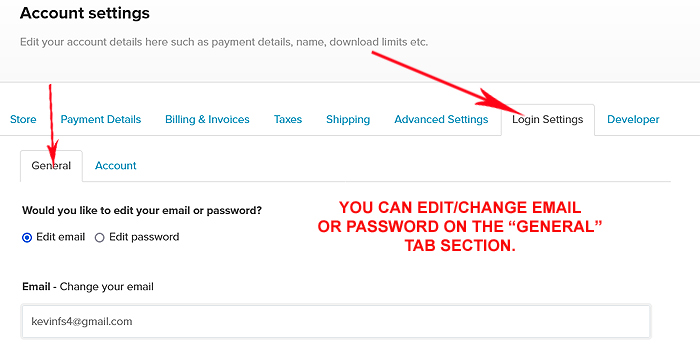
On the “GENERAL” tab you can edit/change email and/or your password. Just tick your choice and edit away.
TAB 7 Continued.
Click the “ACCOUNT” tab within this “Login Settings” page and you will see 2 options as in my screenshot below.
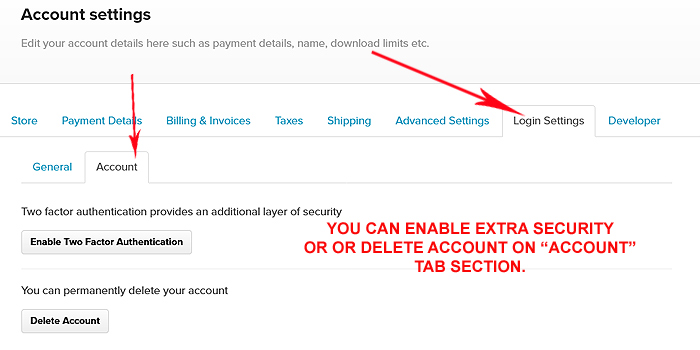
OPTION 1: Two factor authentication provides an additional layer of security.
If you want EXTRA security then to use this, click the “Enable Two Factor Authentication” button.
OPTION 2: Delete Account. Speaks for itself really.
TAB 8: Developer. If you’re not a techie or understand API Keys, Endpoints, URL/PING Requests then leave alone.
OK, so now we’ve set everything up & maybe added a product, what now?
If you haven’t added a product or pages here’s the basics so you can get your website/store looking good.
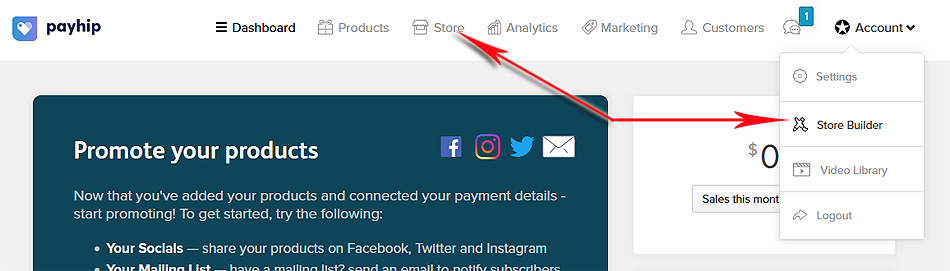
DASHBOARD: Launching the “Store Builder”.
On the dashboard page (if logged in) either click on ACCOUNT (top right) then on STORE BUILDER or click on STORE on top menu then click LAUNCH YOUR STORE BUILDER button. The above will look like the screenshot below.
PAGES: Custom Pages.
You are now in your website/store builder main dashboard where you can add products, pages, edit/add sections, add contact forms and so on, so, click onto the “Custom Page” link top left as in screenshot below.
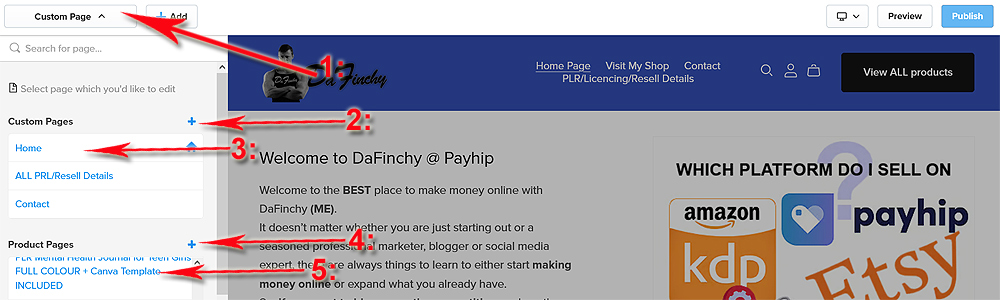
LEFT MENU: Breakdown basics.
Look at the screenshot above, you are now on “Custom Page” section, this may be confusing as it has many functions, and I will break each one down for you below it.
Now that we are on “Custom Page” (1:) you will notice other sections appear with clickable links.
For now, I am going to concentrate on adding a CUSTOM PAGE (2), custom pages are what the customer sees when first visiting your website/store such as “Home”, “Contact”, “Blog” and of course “Shop”.
As you can see from my screenshot above, I have created 3 custom pages and they are (3:) Home, ALL PLR/Resell Details and Contact. So, how did I make these pages? Well let’s make a new “Home” page to show you the steps then add it to the menu and of course make it our home page so it will be the 1st page customers see when visiting our website/store. (4 & 5 are for adding products by clicking the +).
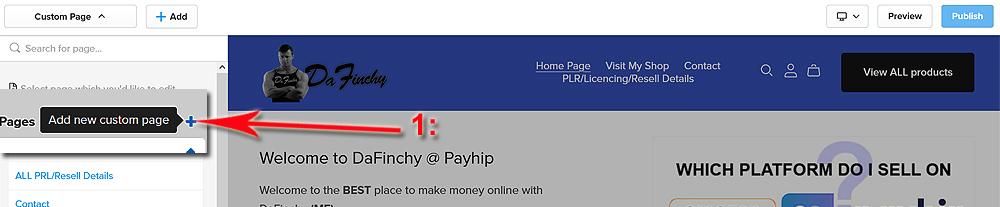
STEP 1: Click on the + sign next to where it shows “Custom Pages” (1) as in my screenshot below.
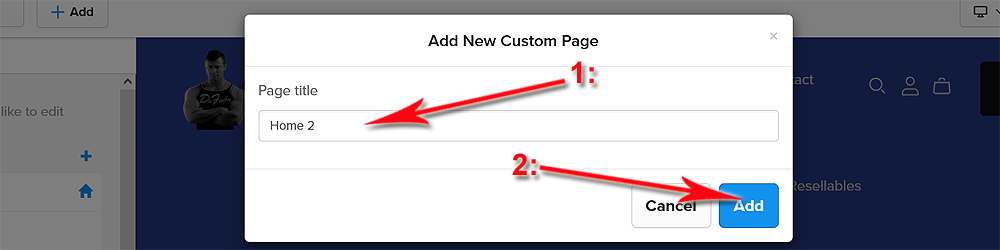
STEP 2: Add New Custom Page “popup” appears, it’s starting point to add a page “Title”, Type in your desired title (1), for training purposes I am going to type in “Home 2” then click the “Add” button (2) as in screenshot.
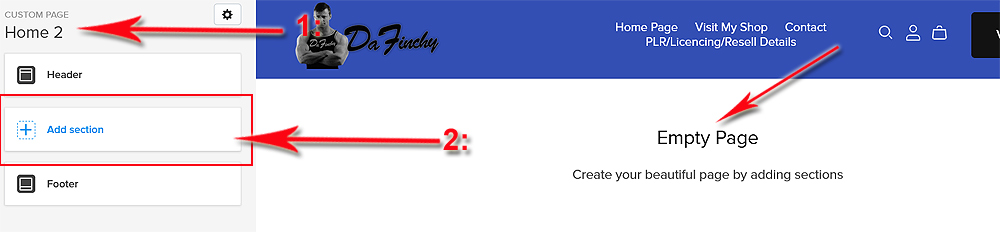
STEP 3: Our basic “EMPTY” page has now been created and a new menu appears on the left side with the page title “Home 2” (1) as in screenshot below. The next step is to start adding content to the page so click the blue + Add Section button (2).
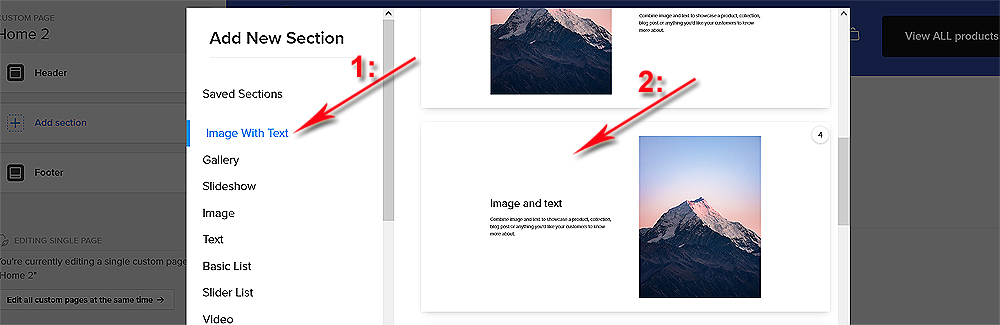
STEP 4: Now a new popup box appears called “Add New Section”, scroll down the left side (1) and choose what you wish to add. For my purposes I am adding “Image with Text”, next scroll down the right-hand section and choose one to use, I have chosen “text on left, image on right” (2 in screenshot below).
STEP 5: Click NEXT or SAVE once choosing the page section in “STEP 4”, this will display a page where you can edit this new section for my “Home 2” page. Look at the screenshot below then I will explain.
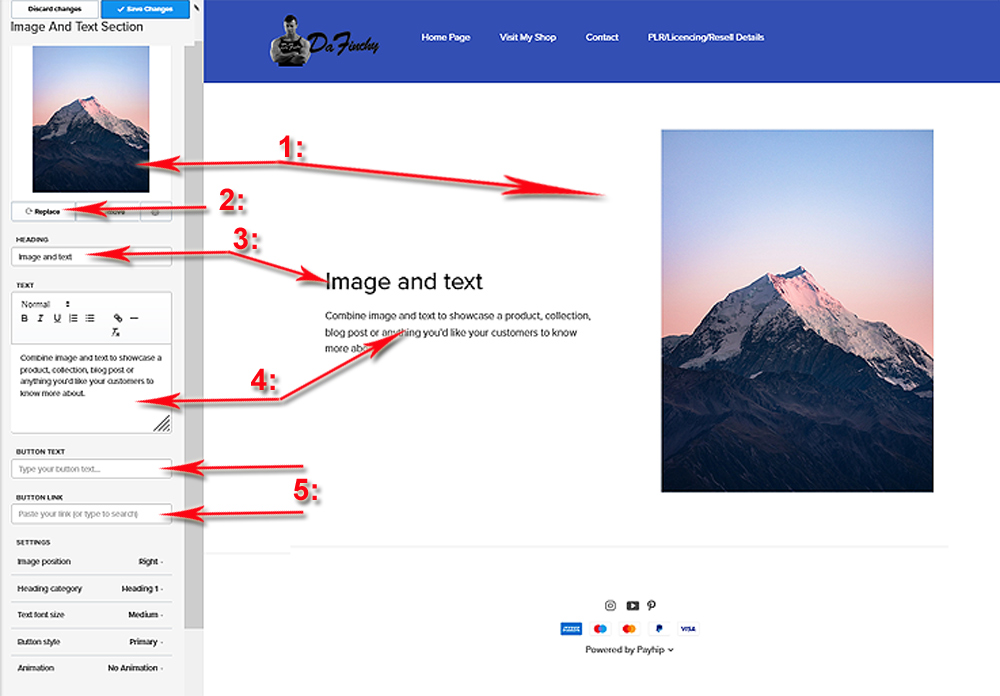
1: This is the image that will be shown on the right of the new page.
2: Click the “Replace” button under the image to upload a new one from your device
3: Type in a new heading here.
4: In the “TEXT” box type in any amount of text you wish formatting as you go, this is like a Word doc editor.
5: You can add a BUTTON here, type in the NAME of the button as you wish it to appear on the page in the “BUTTON TEXT” BOX. You can add a link to any URL, website, page etc here.
Remember to click the BLUE “Save changes” button at the top left of this section.
Next, what happens after clicking SAVE CHANGES?
STEP 6: What happens after clicking “Save Changes”?
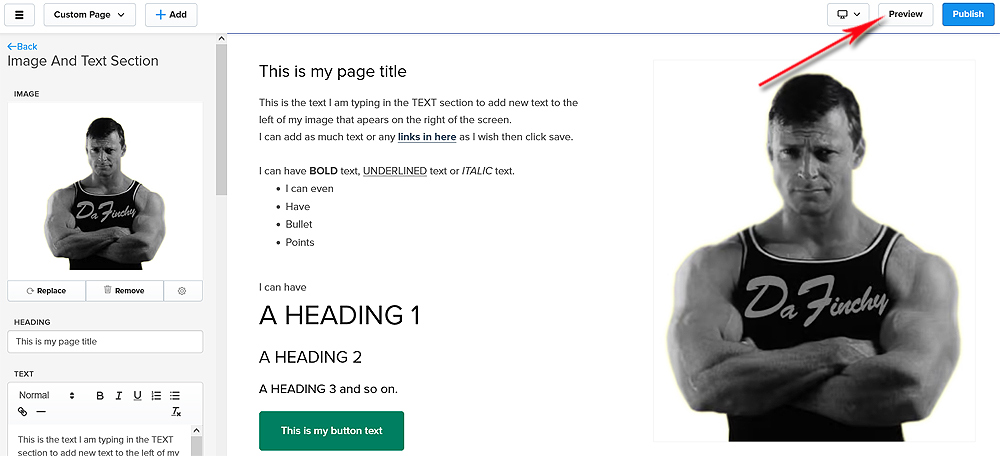
After you have saved the changes, you will stay on the same screen. Now we need to preview our work so, as in the screenshot of my finished 1st section on my new test page (Home 2). I will click the “Preview” button top right.
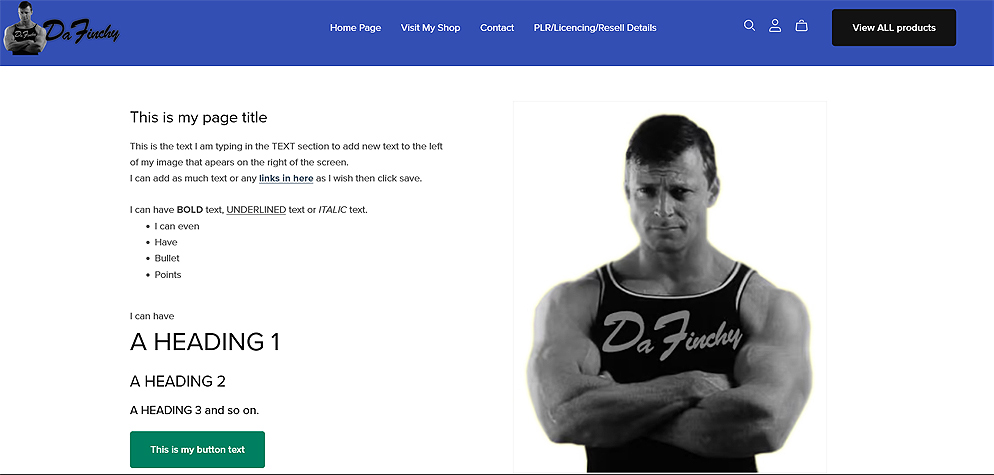
Below is a screenshot of this finished and saved section on my test page “Home 2” we have just made together.
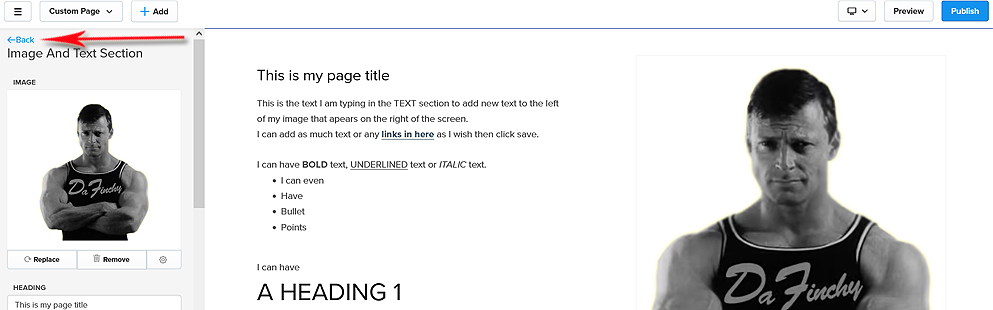
You can close the “Preview” page now as we need to go back into the editor to continue.
STEP 7: Adding more sections.
In the editor where we just finished making our 1st section on our new home page (Home 2) you need to click the blue Back button as shown in screenshot below.
Below you will see a screenshot of the content and sections we just made using the editor but now, we need to add a few more sections. I’ll explain below the screenshot.
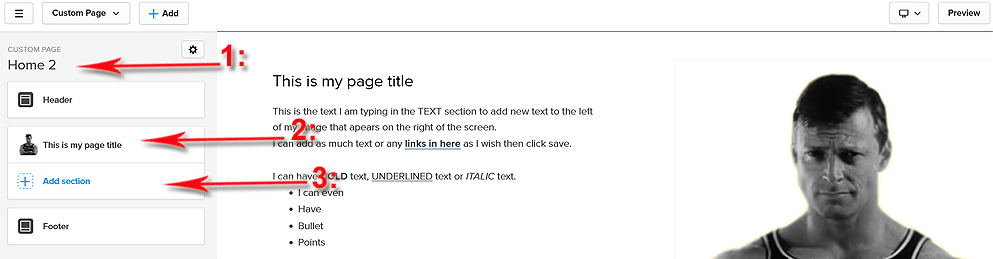
1: Here we can see the title of the new page we just created.
2: Here is the title of the section for the new page we just created.
3: To add more sections to this new page just click the BLUE + Add Section button and follow all the steps we used to make the first section.
REMEMBER to click SAVE after each section is added/created on the new page.
Now that we have added some more sections to the new page, in this case my test page named Home 2 how do we make it our home page and add it to the menu?
Follow the next steps to find out.
STEP 8: making our new page the HOME page.
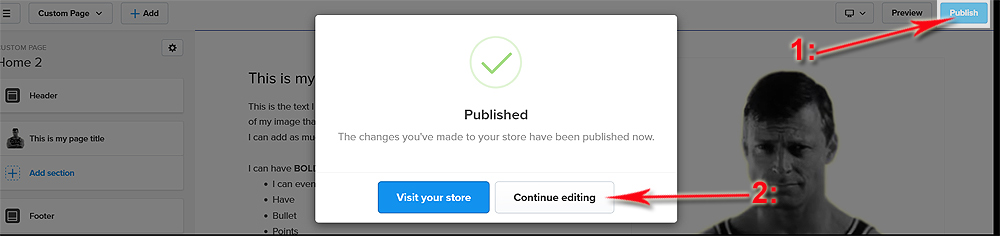
We need to “Publish” our new page, click on the top right BLUE button (1) named “Publish”, a popup screen appears as in screenshot. Click the “Continue Editing” button (2) to close.
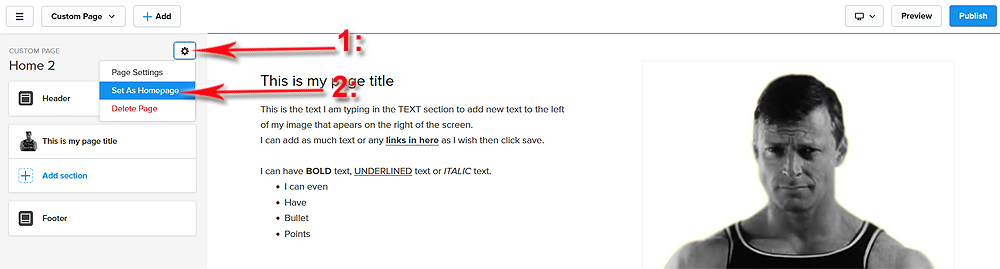
STEP 9: Setting “Published” page as the new Home Page.
To set “Home 2” page as new home page click the COG icon ⚙ top left (1), a dropdown menu appears as in screenshot below, now click the “Set as Homepage” option (2).
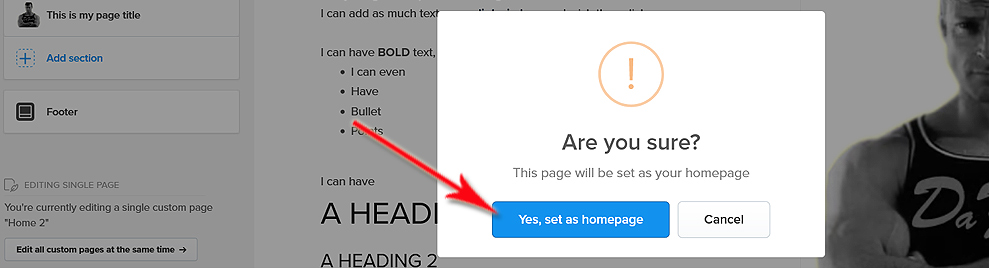
Once clicked “Set as Homepage” blue link a popup box will appear asking “Are you Sure?”, click the BLUE Yes, set as Homepage button as in screenshot below.
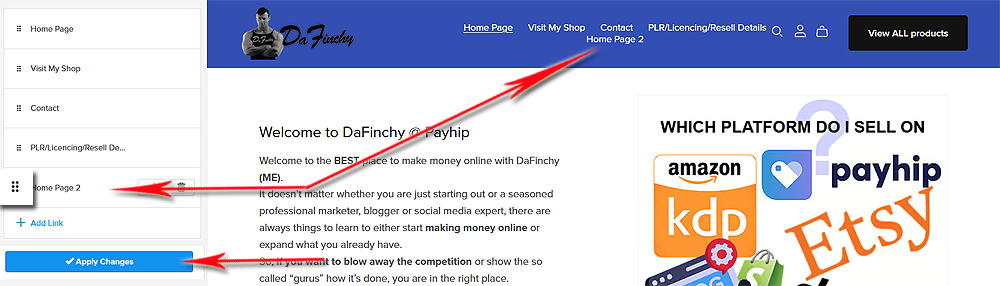
STEP 10: Adding our new home page to the top menu.
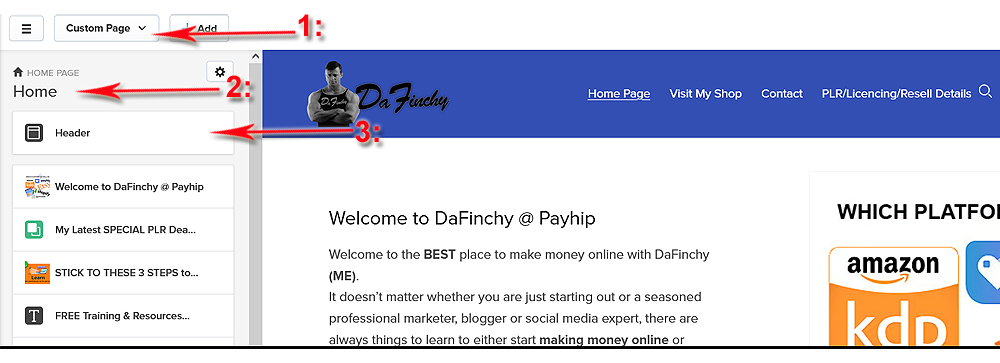
Let’s add a menu for the new Home Page. Make sure you are on the new “Home” page, you can get to this by clicking (1) the top left menu, in the dropdown click the new page named “Home” or “Home 2” we created.
If you are on the correct section, you’ll see (2) our Home page, next click the button “Header” (3) as in screenshot.
Once you click on the “Header” button another page with a small menu on the left will appear click the button named “Navigation Links” (1) as in screenshot below.
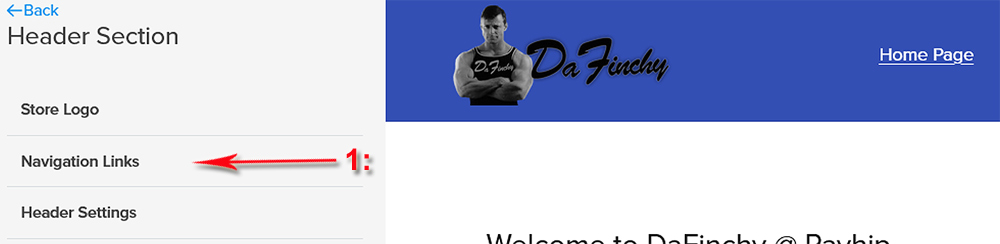
A new menu choice appears, click the BLUE button named “Edit Navigation Links” (2) as in screenshot.

STEP 11: Creating a menu & link for new home page.
After clicking the BLUE “Edit Navigation Links” a popup will appear, look at the screenshot below.
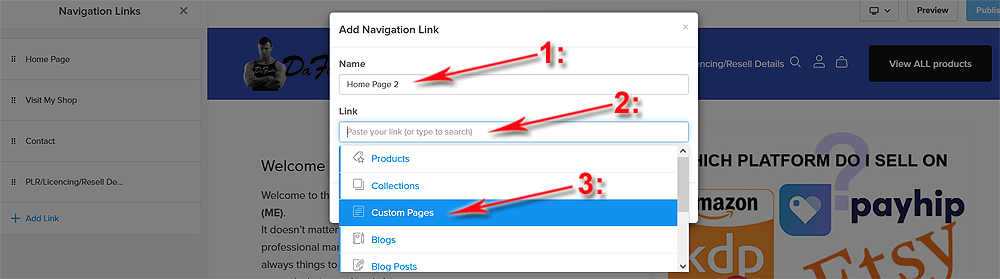
1: Type in the name in the “Name” (1) box as you want it to appear on the menu that we’ll create i.e. Page.
2: Click empty space in the “Links” box (2), a dropdown appears, the new home page a “Custom Page” so click “Custom Pages” (3). Now “Home 2” (1) will appear, click it as shown in screenshot below.
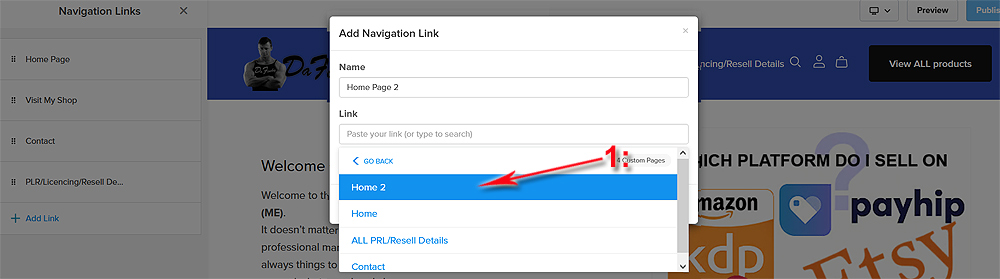
3: To choose to open this page in a new tab, place a tick in the box (1) or leave blank to open page in same tab.
4: Now click the BLUE “Add Navigation Link” (2) as in screenshot below.

STEP 12: moving, saving new menu item & publishing changes.
We have now created a new menu item so when clicked it will go to our new home page.
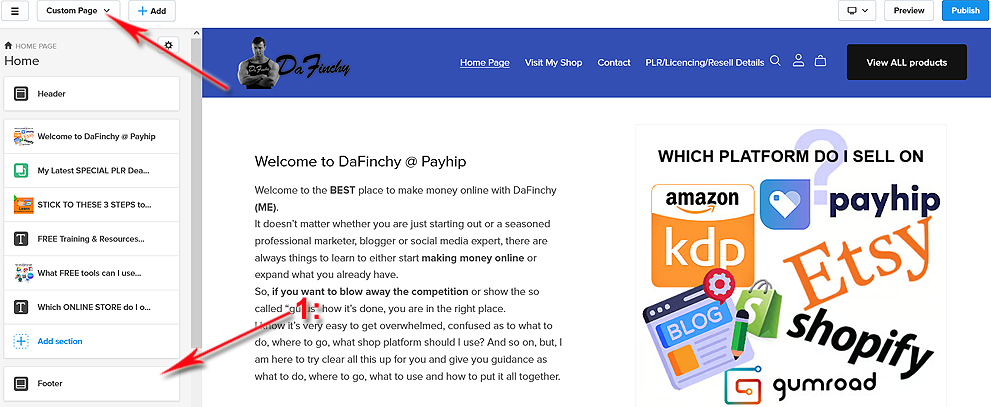
Next, we need to move the “Home” menu link to be the first on the top menu, look at the screenshot, I will explain.
Here on the left is our new menu item “Home Page 2” in the left editor and live on the main top menu.
You can move (reposition) this menu item buy placing your mouse over the 6 dots on the left, click and drag it to the top so it’s now the first menu item.
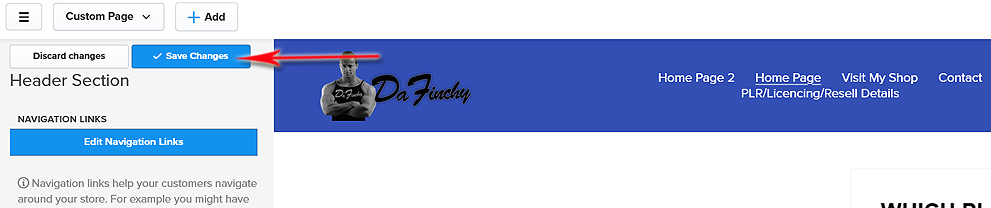
Before going any further you MUST click the BLUE button named “Apply Changes”.
After clicking “Apply Changes” another page will appear with a BLUE “Save Changes” button top left, click this as shown in screenshot below.
We’ve learned how to create Pages, custom pages, products and even a menu what’s left to learn?
Let’s finish with How to Create a Footer, this is the section at the bottom of EVERY page. Here’s mine below.

STEP 13: How to create a footer.
Make sure you are on “Custom Pages” click button bottom left named “Footer” (1) as in screenshot below.
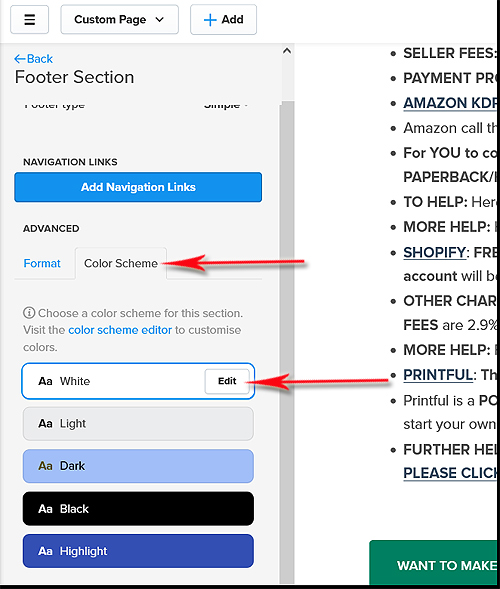
This shows the “Footer Section” as in screenshot below, look below then let me walk you through it all.
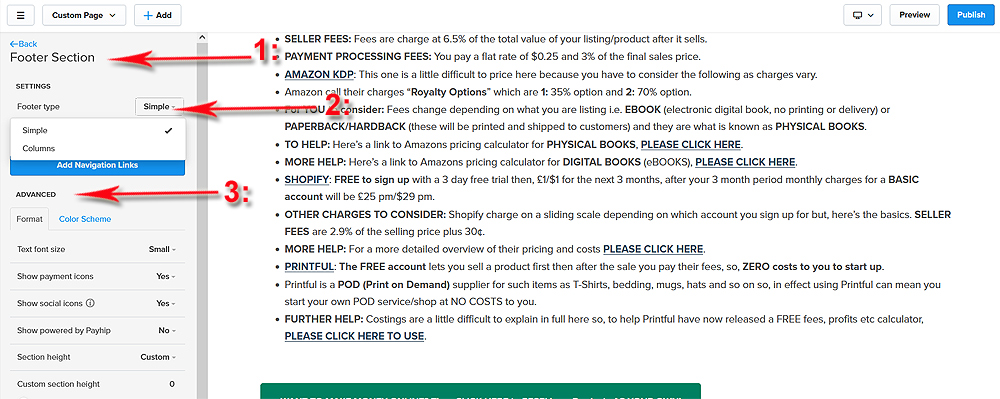
1: Footer Section, this is the area to create and edit your footer.
2: Settings, Footer Type, choose either “Single” or “Columns” by clicking this option, I would choose “Single”.
3: Advanced, if you set up everything correctly right at the beginning of this tutorial then all the options you added such as payment types (PayPal, Stripe), added your social medias, your store details (contacts etc) will show depending on what you choose here, let me go through each for you now.
FIRST Tab in the ADVANCED section named FORMAT:
You have a few options on this tab (FORMAT), let me explain.
Text Font Size: Clicking the options to the right lets you choose “Small, Medium or Large” font (text) sizes, I’d suggest “Small”, looks a lot nicer on screen.
Show Payment Icons: 2 options, YES or NO, I’d suggest YES as this instils confidence in buyers.
Show Social Icons: Same options here too, again, I’d suggest choosing YES for the same reason.
Show Powered by PayHip: I’d choose NO.
Section Height: Select “Custom” then set “Custom Section Height” to 0, makes it very neat & tidy.

If you want to add LINKS to your footer, click the BLUE “Add Navigation Links” button and follow onscreen advice.
SECOND Tab in the ADVANCED section named COLOR SCHEME:
In the “Color Scheme” tab you have multiple choices as follows.
- White
- Light
- Dark
- Black
- Highlight
This will change the BACKGROUND of your footer; you can click each one to see how it looks at on your footer.
When you place your mouse over any of these colors you will notice an “Edit” button appear. You can click this to further adjust each color but I would leave them as is.
After you are happy with your choice then remember to CLICK SAVE CHANGES which appears after you make any changes.
Make sure to make your pages/changes go live click the “PUBLISH” Blue button top right.

START SELLING WITHOUT CREATING – LEAVE THE HARD WORK TO ME!
There are 3 main things you need to start making an income online (Side Hustle or Residual income).
- A product or service to resell or sell. (eBooks, Tutorials, Planners, Digital/Physical Products)
- Somewhere to sell it from. (A website, an ecommerce store)
- Understand what a “Funnel” is and how to make/use one. (On either a site or store)
- The ability to advertise this for FREE. (Social Media, Pinterest, Free platforms)
1: A product or service to sell or resell.
It could be a physical product like clothes, furniture, toys and so on, this is difficult to do due to the fact you have to buy the product, store it, pack & ship it, very expensive and time consuming to even start to see a return.
A service such as plumbing, consultation, car cleaning and so on, again, these are very difficult to sell because you must spend time with a customer, buy and use products to support this service, convince customers you are better than another person to deliver this service. Very time consuming, customer base is limited.
My 3 personal favourites:
Online courses: These can either be video or in the form of an eBook, you only have to create this once and can sell it multiple times, there is no physical product to store, costs very little to product, most of the time it is FREE, and the returns can be huge!
Affiliate Marketing: This is where you promote and sell other peoples or businesses products and when anyone purchases one of these products we receive a commission, we are not responsible for stock or hosting, dealing with customers or complaints. If done right this can be very lucrative and recurring and the cost is zero to us! YES.
Digital Products: (My ABSOLUTE FAVOURITE). These can be mini courses, lessons, planners, simple tutorials, journals, diaries, social media posts, website templates, the list goes on and, the best thing about this one is you can MAKE ALL OF THESE FOR FREE! Zero stock to hold, can be delivered electronically (downloaded) so no packing or shipping. YOU DON’T have to even create your own from scratch (but you can in FREE Canva).
You can buy eBooks, templates, journals, tutorials and either resell the product or sell the complete template, and, again you only need to buy these ONCE.
These premade, editable, and resalable products are called either MRR (Master Resell Rights) or PLR (Private Label Rights).
If you are interested in this SIMPLE way of making money online and don’t want to create products yourself then please visit MY STORE where you can buy PLR products INCLUDING the templates that you can resell as your own.
2: Somewhere to sell your products:
Like any product/s you need somewhere to sell them from, this, in simple terms would be a FREE WEBSITE with the ability to have its own FREE ONLINE STORE where you can sell your products online with very little work involved in the sale from you! GET YOURS HERE 100% FREE, Plus this document (My tutorial) will guide you through setting it all up in no time.
You would need a way for customers to pay, well, more good news you can set up a PayPal Business Account for FREE and to accept debit and credit cards you can also set up a FREE Stripe Account and let both of these handle all the payments for you.
3: Understand what a “Funnel” is and how to make/use one.
In simple terms a funnel goes like this.
- Show a problem to be solved.
- Use “Call to Action”, this is something that catches the eye or piques interest.
- Use a “Hook”, a hook can be a free gift/download/lesson to get their email address.
- Solve the problem in No.1 with the “Free” gift in No.2.
- Now start emailing in the form of a newsletter offering products or services but DON’T SPAM!
- Now you have trust guide your new customers to purchase products with a “Why they should” statement.
The “How to make one” is another lesson for another day, but you’ll get these from me in due course.
4: The ability to advertise all this FOR FREE:
Believe it or not you DON’T need to spend a fortune (or even a single penny) to advertise and get customers to buy your products. HOW? I hear you scream, well all you would need is some of (preferably all) the following.
- NUMBER 1 is a MUST HAVE, which is a product (preferably digital), we’ve covered this above.
- A Social media account (or 2 or 3). Instagram, Facebook etc.
- A Websites. We’ve covered this above. SIGN UP FOR YOURS HERE!
- A way for customers to pay you (PayPal, Stripe), we’ve covered this above.
- An email marketing service (FREE). Mailer Lite (My favourite), Aweber, Mailchimp and more.
- A FREE giveaway (I do this). Basically, this is just a product, we’ve covered this above.
- A way to “Auto answer” enquiries on Instagram & send links to your offers. ManyChat.
I will go into specifics in future emails and more detail for ALL the above under 4: The ability to advertise all this FOR FREE section.
If you want MORE TUTORIALS on how everything works and how to put it all together then head over to my site and sign up for FREE stuff and other goodies to my FREE newsletter by CLICKING HERE.
FINAL NOTES:
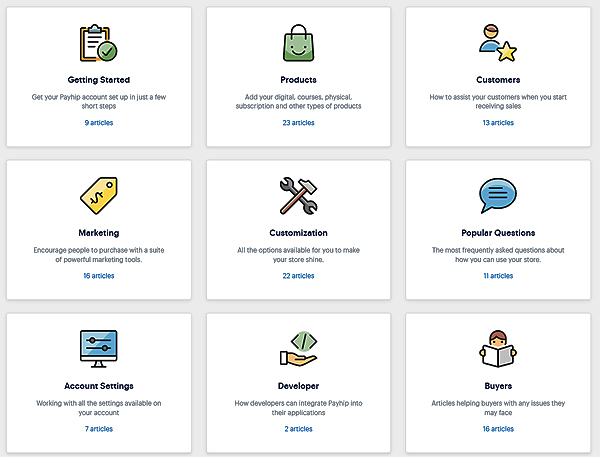
If you need more help there are great additional articles on the PayHip website broken down into categories, I found them extremely helpful, you can visit by clicking the next link: https://help.payhip.com/ and they look like my screenshot below.
Happy Building😁